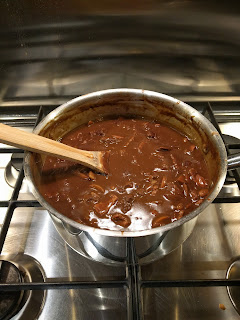
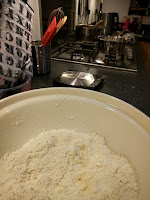
This was prompted by me randomly finding some braising steak in the back of the freezer, some left-overs from last year when I made an awful lot of pies in a fairly short period of time. I hadn't done a hot-water crust pastry for a while (an omission during pastry month in February)...so I decided to combine pastry and chocolate. I'd had a chocolate-based beef pie a while ago, so wanted to see how it worked.
 The pie itself is pretty massive...I used a 20cm diameter tin, and threw in plenty of stuff. As well as the beef, bacon, beer and chocolate there is carrot and baked beans. For the beer, I dug up a chocolate porter (which apparently is sold in
plenty of places, but I could only find some in Marks and
Spencer...previously I had used a double stout, while this was a porter,
so not quite as rich).
Always let the filling cool completely before assembling the pie, otherwise you get 2 issues;
A cool filling makes for a much prettier pie.
1) Put the oil in a large pan (large enough to hold all the fillings, with space for bubbling) on a high heat
2) Add the braising steak to the pan, and cook until sealed and browning
3) Dissolve the stock pots in the boiling water, and add to the pan
4) Add the porter to the pan, and stir to remove the gas (it could bubble up quite a bit initially)
5) Add in the chocolate, and stir until it melts into the sauce
6) Reduce the heat to a simmer, cover, and cook for 1½ hours
7) After 1½ hours, add the carrot and beans to the pan
8) Put the cornflour in a small tub, and mix (slake) with a small amount of water so that it is pourable
9) Add the cornflour mixture to the pan and stir
10) Continue to simmer the mixture for ½ an hour uncovered, allowing the mixture to thicken
11) After the filling has cooked for a total of 2 hours, remove from the heat and allow to cool completely, stirring occasionally.
1) Place the flours and salt in a large bowl
2) Rub the butter into the flour until you get a breadcrumb texture
3) Place the water and lard in a pan, and put on a low heat
4) once the lard has melted, turn up the heat to boil the water
5) Once the water is boiling, pour into the flour mixture, and stir rapidly with a wooden spoon
6) As soon as it's cool enough to handle, start to work and knead the dough to get it smooth
7) Using 3/4 of the dough, line a 20cm diameter tin (I use a lakeland PushPan tin, which is 20cm diameter, and 8cm deep), hand-raising the sides, and making sure that the sides and bottom are even thickness. Make sure the pastry comes over the edge
8) Using 1/4 of the dough, roll out a lid that is slightly large than the tin.
1) Pour the cooled mixture into the tin, making sure to keep the edges clean
2) Brush beaten egg around the edge of the tin, and lay the lid over the top
3) Press down around the edges to seal the lid
4) Using a sharp knife, go round the edge of the tin and remove the excess pastry
5) Crimp the edges of the pie
6) Using the cut-offs, form some decorations for the top of the pie (I did the classic leaves thing)
7) Brush the top of the pie with beaten egg, stick on the decorations, and then brush them as well.
8) Using a knife, make a hole in the middle of the lid (to allow steam to escape)
 9) Bake in the oven for 55-60 minutes
10) Remove to a wire rack to cool
11) As soon as you can handle the tin, remove the pie from the tin (I learnt the hard way that once the pie is fully cooled, its way harder to remove!)
12) Leave to cool completely
 The pie itself is pretty massive...I used a 20cm diameter tin, and threw in plenty of stuff. As well as the beef, bacon, beer and chocolate there is carrot and baked beans. For the beer, I dug up a chocolate porter (which apparently is sold in
plenty of places, but I could only find some in Marks and
Spencer...previously I had used a double stout, while this was a porter,
so not quite as rich).
The pie itself is pretty massive...I used a 20cm diameter tin, and threw in plenty of stuff. As well as the beef, bacon, beer and chocolate there is carrot and baked beans. For the beer, I dug up a chocolate porter (which apparently is sold in
plenty of places, but I could only find some in Marks and
Spencer...previously I had used a double stout, while this was a porter,
so not quite as rich).Always let the filling cool completely before assembling the pie, otherwise you get 2 issues;
- The lid will sink as soon as you put it on
- The filling will boil over, coming out of the steam hole
A cool filling makes for a much prettier pie.
Beef, Beer, Bacon and Chocolate Pie - Recipe
Filling Ingredients
- 800g braising steak
- 10ml sunflower oil
- 200g smoked back bacon
- 500ml Chocolate Porter
- 500ml boiling water
- 2 Rich Beef Knorr stock pots
- 100g dark (70%) chocolate
- 200g Mixed Baked Beans in sauce
- 1 large carrot, thinly sliced
- 20g cornflour
1) Put the oil in a large pan (large enough to hold all the fillings, with space for bubbling) on a high heat
2) Add the braising steak to the pan, and cook until sealed and browning
3) Dissolve the stock pots in the boiling water, and add to the pan
4) Add the porter to the pan, and stir to remove the gas (it could bubble up quite a bit initially)
5) Add in the chocolate, and stir until it melts into the sauce
6) Reduce the heat to a simmer, cover, and cook for 1½ hours
7) After 1½ hours, add the carrot and beans to the pan
8) Put the cornflour in a small tub, and mix (slake) with a small amount of water so that it is pourable
9) Add the cornflour mixture to the pan and stir
10) Continue to simmer the mixture for ½ an hour uncovered, allowing the mixture to thicken
11) After the filling has cooked for a total of 2 hours, remove from the heat and allow to cool completely, stirring occasionally.
Hot Water Crust Ingredients
- 450g plain flour
- 100g strong white flour
- 75g unsalted butter, cubed
- 100g lard
- 200ml water
- Pinch of salt
- Beaten egg (to join and glaze)
1) Place the flours and salt in a large bowl
2) Rub the butter into the flour until you get a breadcrumb texture
3) Place the water and lard in a pan, and put on a low heat
4) once the lard has melted, turn up the heat to boil the water
5) Once the water is boiling, pour into the flour mixture, and stir rapidly with a wooden spoon
6) As soon as it's cool enough to handle, start to work and knead the dough to get it smooth
7) Using 3/4 of the dough, line a 20cm diameter tin (I use a lakeland PushPan tin, which is 20cm diameter, and 8cm deep), hand-raising the sides, and making sure that the sides and bottom are even thickness. Make sure the pastry comes over the edge
8) Using 1/4 of the dough, roll out a lid that is slightly large than the tin.
Assembly
- Pre-heat the oven to 200'C
1) Pour the cooled mixture into the tin, making sure to keep the edges clean
2) Brush beaten egg around the edge of the tin, and lay the lid over the top
3) Press down around the edges to seal the lid
4) Using a sharp knife, go round the edge of the tin and remove the excess pastry
5) Crimp the edges of the pie
6) Using the cut-offs, form some decorations for the top of the pie (I did the classic leaves thing)
7) Brush the top of the pie with beaten egg, stick on the decorations, and then brush them as well.
8) Using a knife, make a hole in the middle of the lid (to allow steam to escape)
 9) Bake in the oven for 55-60 minutes
10) Remove to a wire rack to cool
11) As soon as you can handle the tin, remove the pie from the tin (I learnt the hard way that once the pie is fully cooled, its way harder to remove!)
12) Leave to cool completely


